u.trust LAN Crypt Cloud
PDF ⤓
- What is u.trust LAN Crypt Cloud?
- u.trust LAN Crypt Cloud: Quickstart
- u.trust LAN Crypt Cloud account management
- Administration with u.trust LAN Crypt Cloud
- Key server (ESKM)
- Microsoft Entra ID Synchronization
- Migration of password based keys
- Key management
- Technical Support
- Legal notice
What is u.trust LAN Crypt Cloud?
u.trust LAN Crypt Cloud is a powerful cloud-based application specifically designed for the administration of u.trust LAN Crypt instances within an organization. It is a flexible and efficient solution that provides administrators with a wide range of features to manage u.trust LAN Crypt instances.
This application can be used either as a complement to the existing on-premises administration of u.trust LAN Crypt instances or as a fully-fledged alternative to it. This means that companies have the option of either moving the administration of u.trust LAN Crypt completely to the cloud or using a hybrid solution that combines both on-premises and cloud administration.
Functionality of u.trust LAN Crypt
u.trust LAN Crypt enables the exchange of confidential data within authorization groups in small, medium and large organizations with transparent file encryption. u.trust LAN Crypt works without user interaction.
Encrypted files do not have to be assigned to individual users. Any user who has the required key can work with an encrypted file. This allows administrators to create logical user groups that can collectively access and work with encrypted files. This process can be compared to a kind of keychain used in everyday life. u.trust LAN Crypt provides users and user groups with a keychain whose individual keys can be used for different folders or files.
Every time a user moves a file to an encrypted folder, the file is encrypted on that user’s computer. When another user from the same permission group reads the file from the folder, it is transferred in encrypted form. The file is decrypted only on the recipient’s computer. The user can edit it there. Before the file is transferred back to the encrypted folder, it is encrypted again.
Unauthorized users may be able to access these encrypted files (only from workstations without u.trust LAN Crypt), but without the appropriate u.trust LAN Crypt authorization they will only see their encrypted contents.
u.trust LAN Crypt Cloud: Quickstart
After successful registration the entry into the workflow of u.trust LAN Crypt Cloud is divided into three simple steps:
Step 1: Define assets.
Assets are storage addresses that contain important data for an organization. With u.trust LAN Crypt Cloud, access rights for assets can be controlled and restricted to individuals or groups within the organization. However, before this is possible, storage addresses must be defined as such within u.trust LAN Crypt Cloud.
See Managing assets for detailed instructions on defining assets.
Step 2: Defining Identities
Identities in u.trust LAN Crypt Cloud represent individual users, groups and subgroups of your organization and thus enable a clear modeling of your company structure and an easy assignment of users to groups and subgroups. To achieve this, users must first be created and then the relevant people in your organization must be invited to create an u.trust LAN Crypt Cloud account to identify themselves. As an alternative to manually mapping your organization’s structure, you can import existing structures from an Microsoft Entra ID.
See Managing assets for detailed instructions on defining identities and Microsoft Entra ID Synchronization for importing existing structures from a Microsoft Entra ID.
Step 3: Distribution of access permissions.
Once assets and identities have been created, access permissions can be assigned to users, groups, and subgroups. These permissions can be managed in the Assets and Identities tabs.
See Managing access permissions of groups, users and assets for detailed instructions on how to distribute access permissions.
u.trust LAN Crypt Cloud account management
Registration and login as administrator
The use of u.trust LAN Crypt Cloud requires the registration of an u.trust LAN Crypt Cloud account. After you have successfully completed the registration process, an email for account activation will be sent to the specified address. To activate the registered account, the activation link in the email must be accessed within the next 24 hours. If the registered account has not been activated within this period, it will be deleted. After the account activation, the given e-mail address and the chosen password will serve as login data.
Alternatively, you have the option to register and log in by using a Microsoft account.
Note
- Please note that too many consecutive failed login attempts will result in a waiting period between further attempts. This waiting time is maximum 15 minutes and serves as a protection against brute force attacks on your account.
- There is no permanent lock enforced by the system. However, a locked account cannot be used until the lock duration expires or the account password is reset.
- If the user is inactive for a longer period of time, a new login is required for security reasons.
Registration and login of users of an organization
The registration of a user of an organization can only be initiated by the administrator, but both parties are needed to complete the registration process. When adding a member of the organization under the Identities tab, the user is assigned a unique email address and a login method.
The user then receives an email to confirm their user account. After successful confirmation by setting an account password, the user registration is complete. When using the Microsoft Entra ID login method, it is not necessary to create an additional password. After confirming the user account through the link in the confirmation email, the user can use their Microsoft account for future login processes.
When Microsoft Entra ID login method is used, no activation email is sent. Ths user can immedately login with the Microsoft account.
The user can now log in to the LAN Crypt User Portal. There, they have access to the various LAN Crypt clients and the ability to manage their password.
Note
- If the Microsoft Entra ID login method is selected, it is important to ensure that the specified email address matches the email address of the Microsoft account of the user to be registered.
Requirements for creating a secure password.
A password chosen by the user must meet several requirements to ensure the security of the account:
Length: The password must be at least 8 characters long.
Capital letters: The password must contain at least one capital letter.
Lowercase letters: The password must contain at least one lowercase letter.
Digits: The password must contain at least one digit (0-9).
Special characters: The password must contain at least one special character, such as !, @, #, $, %.
History: Password history requires that the new password be different from the last three passwords used. This is to prevent users from reusing passwords that are too similar or have already been used.
Voidance of user name and email address: The password must not contain the user name or email address.
It is necessary to follow these requirements when creating a password to increase the security of the account and minimize potential points of attack.
Managing account data
To manage your account data, click on your account icon in the top right corner and click Manage your u.trust LAN Crypt Cloud account. Here you have several options to manage your u.trust LAN Crypt Cloud account:
Personal Info: Review and edit personal information. Here you can also set your preferred language and regional format.
Contact: Contact us directly using our form.
Subscriptions: Get detailed information about your subscription.
Clients: Here you will find an overview with links to the various LAN Crypt clients.
Keys: You can export your encryption keys to retain access to encrypted assets even after deactivating your cloud account. In addition, key rotation is available as a recommended security measure, allowing you to renew your keys regularly.
Dashboard: This takes you back to the dashboard overview.
Administration with u.trust LAN Crypt Cloud
Using the Dashboard
The dashboard provides a quick overview of the most important information you need to monitor the performance of your cloud platform. Here you can quickly and easily see at a glance which products have been installed and on which operating systems they are running.
In addition, our dashboard also provides information about the most recently accessed user profiles. You can see who has been active recently and who has not, to better understand how your users are using the applications. It also shows which devices users’ profiles were accessed on, so you know exactly where and how your users are accessing each u.trust LAN Crypt product.
Managing Administrators
Within the LAN Crypt Cloud Administration, you have the ability to add any number of administrators. To manage the administration, first click on the Profile Icon at the top right and then select Manage Account. In the next step, open the Administrators tab. Here, you can add, edit, and remove administrators. Additionally, there is an option to designate an administrator as the primary contact for communication with Utimaco.
Note
- All administrators have the same administrative functions and can therefore also remove other administrators (except themselves).
Managing assets
What are assets?
Assets are storage addresses that contain important data for an organization. With u.trust LAN Crypt Cloud you have the possibility to control and manage access to these storage addresses. You can own multiple assets and restrict access to them to individuals or groups within your organization. Access permissions are implemented by securely encrypting the data in the storage addresses, and matching keys are distributed only to authorized groups and individuals. It should be noted that access permissions to assets are inherited. This means that asset permissions are automatically inherited downwards and thus other assets located in subdirectories are always included when a new asset is defined.
Create and edit assets
To create an asset within the Assets tab, select Active Assets and click the add icon. Now you need to assign the asset a name, a storage address and an asset type. Optionally, you can also directly assign groups that should have access to this asset. However, this can also be done afterwards. Finally, click Save and the asset creation is complete.
Note
- Asset encryption is performed via the LAN Crypt Client. To ensure proper implementation, please ensure that the asset definition matches the file/path pattern used on the endpoint to access the data stored therein (e.g., UNC paths or drive letters used in the asset definition must also be available on and used by the endpoint).
Properties and access permissions of an asset can be edited at any time. The exception here, however, is the Asset type, which remains unchangeable after the initial creation of the asset. To edit the properties of an asset, simply select the respective asset within the listing under the Assets tab. You can also delete created assets directly using the trash icon next to an asset entry.
Deleting and Restoring Assets
If you want to delete an asset, navigate to the Assets tab and select Active Assets or Passive Assets. You can remove the desired asset using the delete icon. Deleted assets are moved to the Deleted Assets section. Any access permissions assigned to users or groups will be removed. The asset can be restored if needed.
To restore an asset, select the Deleted Assets section under the Assets tab. You can reactivate an asset using the restore icon.
When restoring, please ensure that the selected settings and access permissions for the asset meet the current requirements and do not conflict with other active assets. In case of a conflict, you will be prompted to resolve it before the asset can be restored.
Note
- If a passive asset is deleted and later restored, it is reactivated in the Passive asset state.
Passive assets
A passive asset is an asset for which encryption is temporarily deactivated for newly added files.
An asset can be made passive via the menu item Assets → Active assets by selecting the Make asset passive icon. Once an asset has been made passive, newly created files in this asset are no longer encrypted. However, existing encrypted files remain protected and assigned users retain access to them.
The asset is now listed under Assets → Passive Assets. Passive assets retain all configuration parameters. However, only the name of the asset and the assigned users and groups can still be adjusted in order to continue to control access rights to the asset.
Passive assets can be reactivated at any time via the menu item Assets → Passive Assets by selecting the icon for Activate asset and can then be viewed again in the Assets → Active assets window. If a passive asset is reactivated, both existing files and files added to this asset in the future are automatically encrypted again.
Asset types
Shared
The use of Shared assets is recommended for storage addresses whose access rights are to be distributed to one or more groups. Here, all data within the specified storage address is encrypted in the background with an asset-specific key, which is distributed to the assigned groups and persons.
Public
The use of Public assets is recommended for storage addresses whose contents are to be excluded from all encryption. This causes all users of the organization to be able to freely access this content.
Note In order to be able to use the functionality of a Public asset to its full extent, all users who have access to this storage address within the scope of a Shared asset or Private asset must be assigned to the respective Public asset. If this assignment does not take place, all data from unassigned users will be stored encrypted in the storage address of the Public asset.
Private
It is recommended to use Private assets when access needs to be restricted to individual persons. Within these assets, all data is encrypted using individual keys specific to the respective individuals, even if they belong to the same group.
Specifying storage addresses
Storage addresses in u.trust LAN Crypt Cloud define which data is to be encrypted. They represent encryption paths and define encryption rules for this.
Example:
Storage address: C:\my_data\marketing\
By specifying this storage address, all files within the marketing folder will be encrypted.
To avoid any malfunction, make sure the storage address always ends with a forward slash / (for UNIX systems like macOS and Linux) or a backslash \ (for Windows).
Note
- Paths to compressed folders cannot be used as encryption paths.
Specifying storage addresses for SMB Shares
To ensure the correct encryption of your SMB shares, it is crucial that the paths specified in the encryption rules exactly match the paths of your mount points. If the paths do not match exactly, encryption will not be activated.
Example of a correct match:
Rule: \\newhost.newdomain.local\newpath\anotherpath\*.*
Mount: smb://newuser@newhost.newdomain.local/newpath
Environment variables
u.trust LAN Crypt Cloud supports the use of the local environment variable %USERNAME% in path specifications. The environment variable %USERNAME% in path specifications is resolved by u.trust LAN Crypt Cloud by default.
Managing Identities
What are Identities?
Identities represent individual users, groups, and subgroups of your organization within u.trust LAN Crypt Cloud. This enables clear modeling of your internal company structure and, subsequently, the easy assignment of individual users to the respective groups and subgroups.
Creating and Inviting Users
Users can be created and invited under Identities > Users. When creating a new user, First name, Last name, Email address, and a Login method must be specified. A Description is optional. Assignment to Groups can be done directly during creation or at a later point in time.
After creation, the user receives an activation email at the specified address. Depending on the chosen login method, the user is prompted to set a password and activate their account. When using Microsoft Entra ID, no password assignment is required - after account confirmation, the user authenticates via their existing Microsoft account.
Within the Details of a user, the assigned Assets, Group memberships, authorized representatives, used clients, as well as further security information can be viewed and edited.
Creating and Editing Groups
Groups can be created under Identities > Groups. When creating a group, a Name and optionally a Description are assigned. In addition, parent groups can be defined to map a hierarchical group structure.
Name, Description, and parent groups can be adjusted at any time afterwards via the edit function in the group overview.
Within the Details of a group, the assigned Assets, Group memberships, Subgroups, as well as assigned Users can be viewed and edited.
Note
- If a subgroup is subordinate to multiple groups, changes to the subgroup or its subgroups are automatically updated in all corresponding locations.
Managing Access Permissions for Groups, Users, and Assets
Access permissions for assets can be granted in two ways.
Via the Asset Individual users and groups can be assigned directly in the definition dialog of an asset. After creation, this is also possible afterwards in the asset overview under Assets.
Via Identities Alternatively, access permissions can be assigned directly to the respective users or groups under Identities > Users or Identities > Groups. To do this, open the Details of the desired user or group and add the corresponding assets there.
Note Access permissions for assets are inherited. Permissions granted for an asset automatically apply to all assets in its subdirectories.
Note on Group Management with Synchronized Identity Providers
If users and user groups are stored in the LAN Crypt Administration through the synchronization of an identity provider and assets have already been assigned to these groups, it may happen that the company’s central user management (e.g., the IT department) adds new users to these groups without any action from a LAN Crypt administrator. As a result, these users automatically gain access to corresponding assets - without this being explicitly approved within the LAN Crypt Administration.
To avoid such unintended granting of rights, it is recommended to use your own groups within the LAN Crypt Administration instead of the directly synchronized groups. Users from the identity provider can be specifically added to these internal groups in order to manage access control centrally and traceably within LAN Crypt.
Authorized Representative
LAN Crypt Cloud allows you to grant users (authorized representatives) access to the private assets of another user. This covers typical scenarios in the user lifecycle, such as data recovery, task delegation, and succession planning.
-
Recovery: When a user has permanently left the organization, you may need to grant a specific person access to the departing user’s private assets.
-
Task delegation: When a user needs someone to act on their behalf - e.g., during an extended absence - an authorized representative can access that user’s private assets.
-
Successor: When a user takes over or inherits the position or role of another, the successor may need access to the private assets of their predecessor in order to ensure business continuity.
Note
Only private assets are automatically transferred into the access scope of the authorized representative. Assets of other types must still be managed manually.
The authorization is not recursive. If user A is the authorized representative for user B and user B is the representative for user C, user A does not automatically gain access to the private assets of user C.
An authorized representative can be designated for active and deleted users. This applies to local users and users who are no longer captured via Microsoft Entra ID synchronization.
If an active user is deleted (local user) or removed from the Microsoft Entra ID synchronization, the authorized representation remains in place.
Setting Up an Authorized Representative
Under Identities > Users, authorized representatives can be added and removed in the Details of a user in the Authorized Representative section. An authorized representative receives access to the private assets of the respective user.
Network firewall
For a secure and reliable deployment of LAN Crypt, certain domains must be allowed to communicate through your network firewall. Below is a list of the key LAN Crypt domains that require access:
auth.lancrypt.com
portal.lancrypt.com
user-portal.lancrypt.com
feature-flag.lancrypt.com
api.lancrypt.com
2go.lancrypt.com
Settings
Synchronization
In the Synchronization section of the settings, the following configuration options are available:
Refresh interval: Sets the interval at which clients automatically connect to the server to retrieve policy updates.
Policy cache expiration: This setting defines how long received policies remain valid if no connection to the server can be established. Each successful policy refresh resets the set validity period to the full time period.
File encryption
In the File encryption section of the settings, the following configuration options are available:
User may decrypt: This setting determines whether the user is authorized to manually encrypt and decrypt files that are not subject any encryption policy.
Persistent Encryption (Windows): This setting determines whether files should remain encrypted even after being moved or copied.
If persistent encryption is disabled and a user copies an encrypted file into a folder that is not subject to any encryption rule, the file will be automatically decrypted in the destination folder. However, if persistent encryption is enabled, the file remains encrypted even when copied or moved to a folder without an encryption rule. If the file is copied or moved to a location for which a different encryption rule applies, this rule takes precedence over persistent encryption. In this case, the file is encrypted according to the rule defined at the destination location.
More information about persistent encryption of the Windows client can be found here.
Silent mode (Windows): This setting controls whether error messages are displayed on the Windows LAN Crypt Client. When enabled, the messages are suppressed.
Outlook
u.trust LAN Crypt 2Go extends Microsoft Outlook with the ability to encrypt file attachments before sending. In the administration, you can configure the following settings for the Outlook Add-In:
Check on send:
Enables verification of the recipient’s domain. When sending to external email domains, sending unencrypted attachments is prevented.
Internal mail domains:
Allows adding additional email domains that should be considered internal. By default, only the sender’s domain is treated as internal.
Excluded attachments:
Allows defining file types (e.g., .dat, .txt, .xls, etc.) that are excluded from the check and may be sent unencrypted.
Key server
The Key Server feature in LAN Crypt Cloud securely stores encryption keys outside the cloud using an ESKM, ensuring safe key management and seamless encryption and decryption. For more information see chapter Key server (ESKM).
Audit log
The Auditlog tab gives you access to a comprehensive log of your admin activities, which you can filter and search specifically. For example, you can filter by a specific time period, a specific activity type or an affected user by using the corresponding fields. Afterwards, you can confirm the set filters by pressing the blue action button with the magnifying glass icon.
Key server (ESKM)
Key Server functionality
With LAN Crypt Cloud, all keys are securely stored in the cloud by default. Alternatively, the cloud-based administration allows keys to be generated directly encrypted on a key server, enabling independent and self-hosted storage. All administrative functions are still available without restriction, including the secure export function for generated keys.
The key technology LAN Crypt Cloud uses is the Enterprise Secure Key Manager (ESKM) for secure encryption and storage of keys outside the cloud. ESKMs are available in different versions - from simple virtual instances to highly secure, tamper-proof physical devices. All models can be flexibly combined with LAN Crypt Cloud and enable secure key storage.
When an ESKM instance is connected to the LAN Crypt Cloud, all administrative functions are automatically adjusted so that all newly generated keys are retrieved directly from the ESKM instance. This is done seamlessly during the encryption and decryption processes of a managed client. All key retrievals from an ESKM instance to the client are always checked and validated by prior authentication and cryptographic protection of the keys themselves. Even when checking and validating access rights, keys remain in the secure environment and are not transferred to the cloud under any circumstances.
Configuration: LAN Crypt Cloud and ESKM
LAN Crypt Cloud as a local user of an ESKM instance
To use the key server functionality and securely generate keys on an ESKM instance, LAN Crypt Cloud requires a local user—either an existing one or a newly created one—on the corresponding ESKM instance. A new user can be created in the ESKM GUI under Security > Users & Groups > Local Users & Groups. Communication between the LAN Crypt Cloud and the ESKM instance takes place via the RESTful API.
The following settings are recommended for creating the user:
KMIP-enabled: Disabled
User Administration Permission: Disabled
Change Password Permission: Disabled
License Type: RESTful API
Certificate generation
To establish secure communication between LAN Crypt Cloud and an ESKM instance, you need to generate a certificate in the ESKM GUI by navigating to Security > Certificates.
When creating a certificate, you can include one or more IP addresses and DNS names inside the Subject Alternative Name setting. They should be listed using the following format:
IP: 192.0.2.1, DNS: example.com, IP: 2001:db8::1
Note
There are two ways to create a certificate: Certificate Request - to be signed by external CA and Certificate Signed by Local CA.
If you plan to use a certificate signed by a local CA, you must first create the local CA under Security > Local CAs in the ESKM GUI.
After generating the certificate, you must assign it to the ESKM instance’s REST Server interface. To do this, go to Device > Rest Server in the ESKM GUI and select the certificate inside the Server Certificate setting. The Enable Key and Crypto Operation setting must also be enabled.
Linking ESKM as a key server in LAN Crypt Cloud
If there is a local user for LAN Crypt Cloud in the ESKM instance, this can now be linked to LAN Crypt Cloud and the ESKM instance can be used as a key server. To do this, log in to your LAN Crypt Cloud administration and navigate to Settings > Key Server.
Now enter the access data. The user name and password can be found in the local user created in the ESKM GUI. The default port number of the REST server for communication via the RESTful API is 8443. However, this port number can vary depending on the configuration and can be adjusted in the ESKM GUI under Device > Rest Server.
The certificate used for LAN Crypt Cloud is generated in the ESKM GUI and linked to the REST Server interface. It can be found in Security > Certificates and usually appears in the following format:
-----BEGIN CERTIFICATE-----
MIIBIjANBgkqhkiG9w0BAQEFAAOCAQ8AMIIBCgKCAQEAtJDJ5Jd+G7BRM4nV1P8K
Kw2RyOaTYXZBfHlxNE+g9kw+j8HjkEHzEJDrZH4uD8mDKOPrlgP9S/y9YZRJaSHo
yMbHQU3WpCvNDgNm84hfdU9KsXqY5GWiVmVz3XOiF3pyT7ynwwEvF8Fv5RJF7BtT
QKnST1m4H19dkc4pYrX53MStpSpxrZ7FkUXYHRdLdU47jUGRP2/lSyJ4DH9D5vIe
mT2HBgh69y8QoXaNzThpjDEy4oqTcVPAVC9MzP9kX9iNSp9hWeSWkwWKHxZCbfKP
-----END CERTIFICATE-----
Copy the full certificate data including the BEGIN and END lines and paste it into the certificate field in the LAN Crypt Cloud administration.
Note
To verify which certificate is linked to the ESKM’s REST Server interface, navigate to Device > Rest Server in the ESKM GUI. Here, the currently linked certificate is displayed.
Before activating the Key Server integration, it is highly recommended to perform a connection test. When saving the settings, a confirmation window will appear displaying a command based on the entered data, such as username, password, and host/IP. Click the ‘copy icon’ to copy this command to your clipboard, execute it in the command line, and ensure that the output reads “Success.” Only proceed with finalizing the configuration if the connection test is successful.
Activating Key Server integration is an irreversible action. Once activated, all newly generated keys will be created and securely stored in the Key Server. Existing keys, however, will continue to reside in the cloud and remain accessible. Once Key Server integration is activated, responsibility for ensuring uninterrupted access to encrypted data, including backup, recovery, and service availability, transfers to the third-party Key Server operator. Users must verify that the Key Server operator meets these requirements to prevent potential access loss.
Exporting keys from the ESKM instance
Preparation
To export keys from the ESKM instance, you first need the import-export tool (Profile icon > Manage Account > Clients > Key Import Export Tool for key server) as well as an export file previously created from the Cloud Administration (Profile icon > Manage Account > Keys > Start Key Export).
The import-export tool uses the information from this export file to extract the keys from the ESKM instance. If additional keys are stored in the cloud, they will also be included in the final key file.
The generated key file is compatible with LAN Crypt 2Go and can be used for the manual decryption of files.
Running the Import Export Tool
Windows
Run the tool:
LCKeyImportExport.exe export --keyfile <PATH> --output <OUTPUT>
macOS
Remove quarantine flags (once):
xattr -c LCKeyImportExport
Make the tool executable (once):
chmod +x LCKeyImportExport
Run the tool:
./LCKeyImportExport export --keyfile <PATH> --output <OUTPUT>
Linux
Make the tool executable (once):
chmod +x LCKeyImportExport
Run the tool:
./LCKeyImportExport export --keyfile <PATH> --output <OUTPUT>
Command Options:
| Option | Description |
|---|---|
--keyfile <PATH> |
Path to the key export ZIP file. |
--keyfile-password <keyfile-password> |
Password to open the encrypted key export ZIP file. Only required if the file is password-protected. |
--keyserver-accept-invalid-certs |
Accepts invalid SSL certificates - USE WITH CAUTION. |
--output <OUTPUT> |
Name of the output file. It should end with .zip. |
-h, --help |
Show help. |
Microsoft Entra ID Synchronization
In addition to adding users and groups manually, u.trust LAN Crypt Cloud can also synchronize user and group information from a Microsoft Entra ID. This is a quick and easy way to assign assets based on the organizational structure you already know. This is an outbound-only sync, where changes are only transferred from the Microsoft Entra ID to the application and not vice versa. This means that changes made in u.trust LAN Crypt Cloud are not synchronized back to the Microsoft Entra ID, but only changes within the Microsoft Entra ID are imported to u.trust LAN Crypt Cloud.
The Synchronization requires a few setup steps that are necessary to establish a connection between u.trust LAN Crypt Cloud and your Microsoft Entra ID. Once the connection is established, importing and synchronizing the latest user information can be done with one click within u.trust LAN Crypt Cloud.
Description of the setup process
Step 1: Registering u.trust LAN Crypt Cloud as an application with Microsoft Identity Platform
The first step of the setup process is to register u.trust LAN Crypt Cloud as an application with the Microsoft Identity Platform, because it performs identity and access management (IAM) only for registered applications. Registering u.trust LAN Crypt Cloud establishes a trust relationship between the application and the Microsoft Identity Platform. The trust is unidirectional: u.trust LAN Crypt Cloud trusts the Microsoft Identity Platform and not vice versa.
It is recommended to use a unique name for the application registration to clearly identify the application. It is important to select Accounts in any organizational directory (Any Microsoft Entra ID tenant - Multitenant) when selecting Supported account types for application registration.
For information about registering an application with Microsoft Identity Platform, see Quick Start: Registering an Application with Microsoft Identity Platform.
Step 2: Grant API Permissions
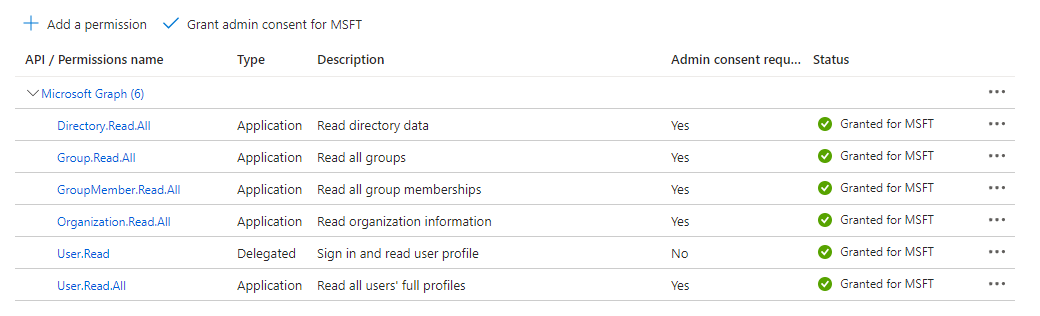
In the next step API permissions have to be assigned to the registered application. These are necessary to allow u.trust LAN Crypt Cloud to authenticate itself without user interaction or consent.
To ensure full functionality of u.trust LAN Crypt Cloud six different permissions are required:
-
Directory.Read.All
-
Group.Read.All
-
GroupMember.Read.All
-
Organization.Read.All
-
User.Read
-
User.Read.All
Note
- When granting permissions for Microsoft Graph, you have two choices. It is important to select Application permissions since the synchronization operates in the background as a service.
Finally, after configuring API permissions, administrative approval must be granted to complete the configuration.
For information on granting API permissions to an application, see Quick Start: Configuring a Client Application to Access a Web API.
Step 3: Configuring the login information
u.trust LAN Crypt Cloud requires the configuration of credentials within the Registered Application with Microsoft Identity Platform to access the Microsoft Graph API. A secret client key allows the application to authenticate without requiring manual intervention from a user.
Create a new secret client key and select a desired validity period. A validity period of no more than 12 months is recommended.
Important: The generated secret ID will not be displayed after changing or closing the dialog. Since this is required for establishing a connection with u.trust LAN Crypt Cloud, it is recommended to keep it in another safe place.
For information on how to create a secret client key, see Quick Start: Registering an application with Microsoft Identity Platform.
Step 4: Connection setup with u.trust LAN Crypt Cloud
After all the Microsoft Entra ID Synchronization setup steps have been completed, the connection with u.trust LAN Crypt Cloud can be established.
To do this, log in to u.trust LAN Crypt Cloud and select the Identity provider dialog and then Connections. Create a new connection with the blue action button and now enter any Connection Name, the Directory ID (Tenant), the Application ID (Client) and the previously generated Client Secret and click Next.
Now define the login method for your users and then click Next again. A summary of the Microsoft Entra ID synchronization is then displayed. Click on Create to complete the connection setup.
Note
The Directory ID (client) and Application ID (client) can be viewed under Overview within the application at Microsoft Identity Platform.
Changes to the logon method will only take effect for all users after the next synchronization. From the next sign-in onward, all users will be required to use the newly configured method.
Import and manage user and group information
User and group information from various Microsoft Entra IDs can be imported, updated, or deleted from u.trust LAN Crypt Cloud at any time. With this capability, administrators can quickly make changes to imported user and group information and ensure that the directory is always up to date.
Import user and group information.
To import new user and group information for the first time, log in to u.trust LAN Crypt Cloud and select the Import dialog under the Identity Provider item. Now you can select and import the desired persons and groups from all existing Microsoft Entra IDs. The import process is started and can be viewed under Import Jobs under the item Identity Provider. The imported users and groups can be assigned and managed under the item Identities in the groups created within the u.trust LAN Crypt Cloud.
Additional user and group information can also be viewed at any time via the dialog Import.
Update and delete user and group information.
Under the Identity Provider item, existing user and group information can be updated and connections to Microsoft Entra IDs deleted in the Connections dialog. To do so, click on the corresponding icons in the entry of the respective Microsoft Entra ID connection.
It is also possible to enable automatic, recurring synchronization. Under the Recurring section, you can define a time interval at which the current user and group information is automatically synchronized. Regardless of this setting, synchronization can still be triggered manually at any time.
Note
The interval is calculated from the time of the last synchronization — a triggered sync resets the timer and serves as the new starting point for the subsequent intervals.
If one deletes the connection to a Microsoft Entra ID, all associated groups and users are automatically removed from the administered pool of identities.
Migration of password based keys
LAN Crypt 2Go and all mobile u.trust LAN Crypt applications support encryption with password-based keys. These keys are created and managed by the user. When created, password-based keys are stored locally in the user’s key ring on the device itself. Keys are not synchronized with other devices and therefore must be added manually on each device on which they are needed.
When a user logs in with their u.trust LAN Crypt Cloud account, all newly created keys are linked to their account and uploaded to the Cloud Management System. This allows synchronization with all other devices where the user logs in with his u.trust LAN Crypt Cloud account.
When a user logs in for the first time within a u.trust LAN Crypt Cloud LAN Crypt application that supports encryption with password-based keys, a check is made to see if keys are stored in the user’s local key ring. If the user has already created password based keys before, there are two options to proceed. The first option is to connect to the cloud - where all locally created keys will be uploaded to the cloud. Alternatively, the process can be aborted if it is not wanted that some or all of its keys are uploaded. In the latter case, it is possible to delete all keys from the key ring that are not to be uploaded to the cloud. After logging in again, all the desired keys are then linked to the account and uploaded to the cloud.
Key management
Performing a key rotation
Key rotation is a security feature that replaces existing encryption keys with new ones to ensure data security at all times. It can be started at any time and as often as desired.
With each rotation, new keys are generated, which are then used to encrypt and decrypt new data within assets. Existing files remain encrypted with the previously used keys; these keys are not lost and are also exported when the encryption keys are exported.
To start a key rotation, click on the profile icon and select Manage Account in the settings window. Then click on Keys and start a key rotation. Once a key rotation has been completed, the administrator receives a notification by email, and the current status of the key rotation can be viewed directly in the corresponding tab.
Exporting encryption keys
Administrators of u.trust LAN Crypt Cloud can generate a key export file containing all created encryption keys. This file is essential for organizations planning to discontinue the use of LAN Crypt, as it allows for the decryption of all encrypted files using the u.trust LAN Crypt 2Go command line tool.
To export the keys, click on the profile icon and select Manage your account in the settings window. Then, click on the Keys tab to initiate the process. Once the export process completes successfully, you can download the key export file, which will be a password-protected ZIP file containing a single JSON file with all encryption keys for your organization.
The password for the ZIP file will be sent via email after the successful export.
For detailed instructions on using the exported keys to decrypt files with the u.trust LAN Crypt 2Go command line tool, see Using the u.trust LAN Crypt 2Go commmand line tool inside the u.trust LAN Crypt 2Go documentation.
Technical Support
Technical support for Utimaco products can be accessed as follows:
At support.Utimaco.com, maintenance contract customers can access additional information, such as knowledge items.
As a maintenance contract customer, send an email to technical support:
and specify the version number(s), operating system(s) and patch level of your Utimaco software and, if applicable, the exact wording of any error messages.
Legal notice
Copyright © 2024 - 2026 Utimaco IS GmbH, 2018 - 2024 conpal GmbH, 1996 - 2018 Sophos Limited and Sophos Group. All rights reserved. conpal®, AccessOn® and AuthomaticOn® are registered trademarks of conpal GmbH.
All other product and company names mentioned are trademarks or registered trademarks of their respective owners.
This publication may not be reproduced, stored in a retrieval system, or transmitted, in any form or by any means, electronic, mechanical, photocopying, recording, or otherwise, unless you either have a valid license to reproduce the documentation in accordance with the license agreement, or you have received written permission from the copyright owner.
For 3rd party copyright information, refer to the 3rd party software document in your product directory.
Last updated 12.06.2026.